Save
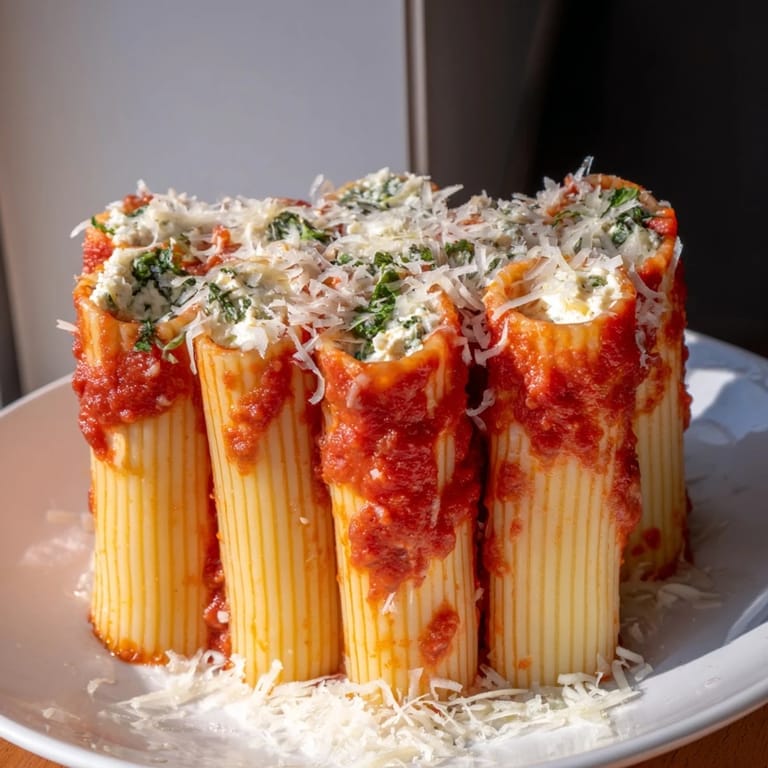
Save The first time I stood a tube of pasta upright and filled it like a tiny edible vessel, I felt like I was building something instead of just cooking. My friend Sarah had shown me this technique years ago at her family dinner, and watching those rigatoni tubes transform into golden, cheese-stuffed towers felt like creating art you could actually eat. There's something magical about the visual—this honeycomb of pasta and cheese that looks far more impressive than it actually is to make. When I finally tried it myself, I realized that the magic wasn't in complexity, but in how the creamy filling stays hidden until you slice into it and discover that pocket of ricotta and herbs.
I made this for a dinner party where my cousin brought his new partner, and I wanted something that would feel special without screaming that I'd spent all day cooking. Watching them take that first bite and just pause—that moment when people realize the food tastes as good as it looks—reminded me why I love cooking. The honeycomb pattern on the plate caught the candlelight, and suddenly it wasn't just pasta bake anymore, it was the centerpiece of an evening that felt memorable.
Ingredients
- Rigatoni pasta (500 g): You need tubes large enough to stuff but sturdy enough not to split, which is why rigatoni is the perfect choice here—almost no other pasta shape gives you that ideal combination.
- Ricotta cheese (350 g): This is your base, creamy and mild, it takes whatever flavor you add without overpowering anything.
- Mozzarella, shredded and grated (100 g plus 150 g for topping): Buy a block and shred it yourself if you can—pre-shredded tends to get gummy when baked.
- Parmesan cheese (50 g plus 2 tbsp for topping): The sharp bite that keeps the filling from feeling one-dimensional and boring.
- Egg (1 large): This binds everything together and keeps the filling creamy rather than dry during baking.
- Fresh basil and parsley (1 tbsp each): Fresh herbs make all the difference—dried won't give you that brightness that lifts the whole dish.
- Marinara sauce (700 ml): Use a sauce you actually like eating on its own, because it's the backbone here.
- Olive oil (1 tbsp plus more for cooking): Just enough to keep everything from sticking, nothing fancy.
- Salt and black pepper: Season to taste as you go, especially the filling.
Tired of Takeout? 🥡
Get 10 meals you can make faster than delivery arrives. Seriously.
One email. No spam. Unsubscribe anytime.
Instructions
- Get Your Workspace Ready:
- Preheat your oven to 200°C and grease your baking pan with olive oil, lining the bottom with parchment paper so the finished bake slides out cleanly. This step takes two minutes but saves you from disaster later.
- Cook the Pasta Just Shy of Done:
- Boil the rigatoni for two minutes less than the package says—you want them al dente, still with a slight firmness that won't turn mushy when they bake. Drain and toss with a tiny bit of olive oil so they don't clump together while you're stuffing them.
- Build Your Creamy Filling:
- Mix ricotta, both cheeses, the egg, and your fresh herbs in a bowl until smooth and spreadable. Taste it and adjust seasoning—this is where you catch any bland spots before they make it into the oven.
- Stand the Tubes Upright:
- Pack your cooked rigatoni vertically into the pan like you're building a little pasta city, arranging them snugly so they support each other and fill the entire space. They should be tight enough that they don't fall over but loose enough that you can still fit a piping bag down into each tube.
- Fill Each Tube with Care:
- Spoon your cheese mixture into a piping bag or a zip-top bag with the corner snipped off, then pipe the filling down into each pasta tube until it's full but not overflowing. You'll find a rhythm with this—it becomes almost meditative.
- Pour the Sauce and Let It Settle:
- Pour your marinara evenly over the filled pasta and tap the pan gently a few times so the sauce drifts down between the tubes and kisses the bottom. This ensures every bite has sauce, not just the top layer.
- Top with Cheese:
- Sprinkle your shredded mozzarella and grated Parmesan across the top, covering everything lightly so they'll turn golden and bubbly.
- Bake Covered, Then Exposed:
- Cover the pan loosely with foil and bake for 25 minutes, then remove the foil and bake another 10 minutes until the cheese is melted, bubbly, and golden at the edges. The foil keeps the pasta tender while the final uncovered minutes give you that glorious brown top.
- Rest Before Serving:
- Let it sit for 10 minutes so the filling sets slightly and everything holds together when you slice. This pause also lets the flavors settle and meld.
 Save
Save There's a moment when you pull this out of the oven and the kitchen fills with that smell—marinara and melted cheese and herbs all at once—and your whole family knows something special is happening. That's when dinner becomes more than sustenance; it becomes the reason everyone gathers around the table.
The Magic of Standing Pasta
The visual of upright pasta tubes creates something almost sculptural on the plate, like you've engineered something rather than simply assembled it. The way each tube catches the sauce and cheese makes the presentation feel intentional and impressive, but here's the secret—it's actually easier to manage than a traditional baked pasta where everything gets jumbled. Standing the tubes vertically also helps the filling cook evenly because the heat surrounds each one individually instead of everything baking together in a dense mass.
Customizing Your Filling
The beauty of this recipe is how forgiving the filling is once you have your base of ricotta and cheese. I've stirred in sautéed spinach on nights when I wanted something darker and more substantial, and I've mixed in crumbled cooked sausage when I felt like adding a savory note. You can even swap the ricotta for cottage cheese if that's what you have on hand—it gives you a slightly different texture but the same creamy effect.
Making It Your Own
This dish is flexible enough to bend with whatever season you're cooking in or whoever you're cooking for. In summer, I lean heavier on the fresh herbs and sometimes add sun-dried tomatoes to the filling for brightness. When it's cold outside, I make it richer by adding a touch more cheese and sometimes a whisper of nutmeg in the filling because nutmeg with ricotta just works in ways that feel like comfort on a plate.
- Try adding finely minced garlic to your cheese mixture for extra depth, but go light so it doesn't overpower the delicate ricotta.
- If you want it spicier, add red pepper flakes to the marinara sauce before pouring it over the pasta.
- Leftover bake keeps beautifully in the fridge and reheats gently in a 160°C oven covered loosely with foil, so don't hesitate to make this when you have time and enjoy it throughout the week.
 Save
Save Every time I make this, I'm reminded that some of the most memorable meals come from the dishes that look like you put real thought into them. This honeycomb of cheese-filled pasta tubes does exactly that, and it tastes like you've been cooking Italian all your life.
Recipe Guide
- → How do I prevent rigatoni from sticking together?
Toss the pasta with a bit of olive oil immediately after draining to keep each tube separate during preparation.
- → Can I prepare the cheese filling in advance?
Yes, the cheese mixture can be made ahead and refrigerated for a few hours, which helps the flavors meld well.
- → What is the best way to fill rigatoni tubes evenly?
Use a piping bag or a zip-top bag with a small corner cut off to pipe the cheese mixture neatly inside each pasta tube.
- → How can I make the bake more flavorful?
Add sautéed spinach or cooked Italian sausage to the cheese filling for an extra depth of flavor.
- → What type of baking pan works best?
A 23 cm (9-inch) springform or deep round pan is ideal to hold the upright rigatoni securely while baking.