 Save
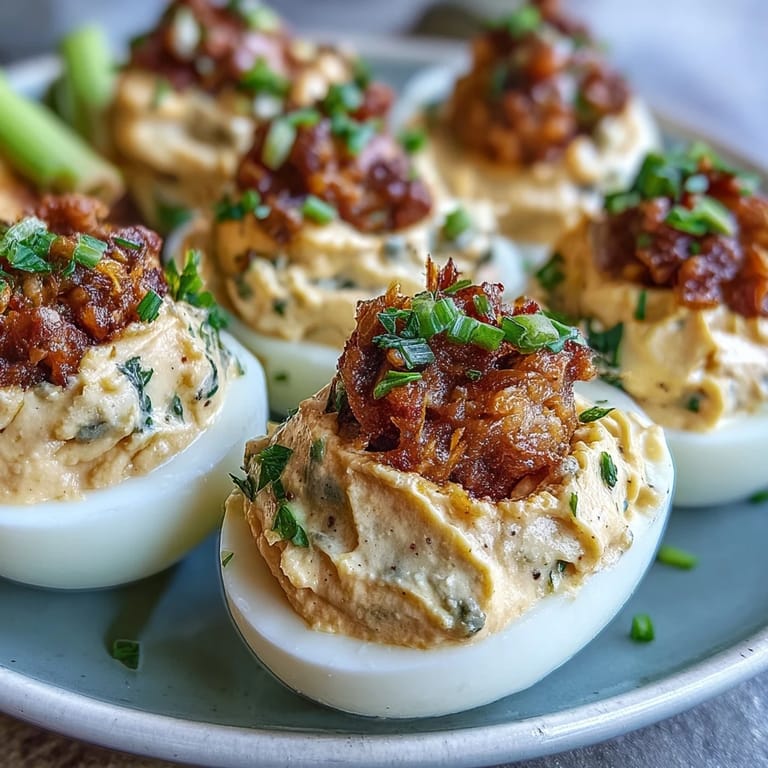
Save There's something irresistibly charming about deviled eggs transformed into adorable baby chicks. These Deviled Egg Chicks bring whimsy and nostalgia to your Easter table, delighting children and adults alike with their playful presentation. Beneath their cute carrot beaks and peppercorn eyes lies the classic creamy, tangy filling that makes deviled eggs a timeless favorite. This recipe combines traditional technique with creative decoration, proving that food can be both delicious and delightfully entertaining.
Save Making these cheerful chicks requires nothing more than basic kitchen tools and a bit of creativity. The process begins with perfectly hard-boiled eggs, cooled in an ice bath to ensure easy peeling. The secret to their upright stance is a small flat slice from the bottom, while the jaunty cap creates that delightful hatching effect. The creamy yolk filling is enhanced with mayonnaise, mustard, and just a touch of vinegar for classic deviled egg flavor. Then comes the fun part: transforming simple ingredients like carrot triangles and whole peppercorns into expressive little faces that bring each chick to life.
Ingredients
Tired of Takeout? 🥡
Get 10 meals you can make faster than delivery arrives. Seriously.
One email. No spam. Unsubscribe anytime.
- Eggs: 12 large eggs
- Filling: 3 tablespoons mayonnaise, 1 teaspoon yellow mustard, 1 teaspoon white vinegar, ¼ teaspoon salt, ⅛ teaspoon ground black pepper
- Decoration: 24 whole black peppercorns (for eyes), 1 medium carrot (for beaks and feet), optional fresh chives or parsley for garnish
Instructions
- Step 1: Boil the Eggs
- Place eggs in a single layer in a large saucepan and cover with cold water. Bring to a boil over medium-high heat. Once boiling, cover, remove from heat, and let stand for 10 minutes.
- Step 2: Cool the Eggs
- Transfer eggs to a bowl of ice water and let cool completely, about 5 minutes.
- Step 3: Peel and Dry
- Gently peel the eggs and pat dry.
- Step 4: Create the Base and Cap
- For each egg, slice a small portion off the bottom so the egg stands upright. Slice off the top ⅓ of the egg (horizontally) to create a cap.
- Step 5: Remove Yolks
- Carefully remove yolks and transfer to a bowl. Place egg whites on a serving tray.
- Step 6: Make the Filling
- Mash yolks with mayonnaise, mustard, vinegar, salt, and pepper until smooth and creamy.
- Step 7: Fill the Eggs
- Using a spoon or piping bag, fill the bottom egg whites with the yolk mixture, mounding it slightly to form the chicks head.
- Step 8: Add the Caps
- Place the egg white caps back on at a jaunty angle to resemble a chick hatching.
- Step 9: Create Beaks and Feet
- Cut tiny triangles from the carrot for beaks, and small slivers for feet. Gently press the beaks and feet into the yolk mixture.
- Step 10: Add Eyes
- Add two black peppercorns for eyes on each chick.
- Step 11: Garnish and Serve
- Garnish with fresh chives or parsley if desired. Serve chilled.
Zusatztipps für die Zubereitung
For the smoothest yolk filling, ensure your eggs are at room temperature before mixing, and use a fork to thoroughly mash until no lumps remain. A piping bag fitted with a star tip creates beautiful rosettes that form the perfect base for your chick decorations. If you don't have a piping bag, a sealed plastic bag with one corner snipped off works wonderfully. When cutting carrot pieces, use a sharp paring knife and make the beaks quite small—tiny triangles look more proportional on the finished chicks. Press decorations gently but firmly into the filling so they stay in place during serving.
Varianten und Anpassungen
Lighten the filling by swapping mayonnaise for Greek yogurt, which adds tanginess and protein while reducing fat. For softer eyes that are easier for young children to eat, use small pieces of black olives instead of whole peppercorns. Add extra flavor dimension by incorporating a pinch of smoked paprika or finely chopped fresh herbs like dill or chives directly into the yolk mixture. For a spicier version, add a tiny dash of hot sauce or a sprinkle of cayenne pepper. You can also experiment with different vegetable decorations—thin slices of red bell pepper make charming beaks, and cucumber slivers can become whimsical wings.
Serviervorschläge
Arrange your Deviled Egg Chicks on a bed of fresh parsley or lettuce to create a festive nest presentation. For Easter brunch, surround them with colorful fresh vegetables, crackers, and cheese for a complete appetizer spread. They pair beautifully with honey-glazed ham, spring salads, and fresh fruit platters. Serve them chilled on a decorative platter as a centerpiece that doubles as entertainment for young guests. These chicks are perfect for egg hunts aftermath snacking, spring picnics, or any occasion where you want to bring smiles along with satisfying flavors.
 Save
Save These Deviled Egg Chicks prove that a little creativity can transform a classic recipe into something truly special. With just 35 minutes from start to finish, you can create a platter of cheerful chicks that will be the talk of your celebration. Whether you're hosting an Easter brunch, a spring birthday party, or simply want to bring joy to an ordinary weekday, these adorable appetizers deliver both visual charm and delicious flavor. The best part? Watching faces light up when they discover that these cute little chicks taste just as wonderful as they look.
Recipe Guide
- → How do I hard boil eggs perfectly for this dish?
Place eggs in cold water, bring to a boil, then cover and remove from heat. Let stand for 10 minutes before cooling in ice water for easy peeling.
- → What can I use to decorate the chick features?
Carrot pieces form the beaks and feet, while whole black peppercorns make excellent edible eyes.
- → Can I substitute mayonnaise in the filling?
Yes, Greek yogurt works well as a lighter alternative while maintaining creamy texture.
- → How should I store prepared egg chicks?
Keep them covered in the refrigerator and consume within one day for best freshness.
- → Is it possible to add extra flavor to the filling?
Adding a pinch of paprika or fresh chopped herbs enhances flavor without overpowering the creamy base.
- → Are these suitable for gluten-free diets?
Yes, all ingredients used are naturally gluten-free, making them safe for gluten-sensitive individuals.