 Save
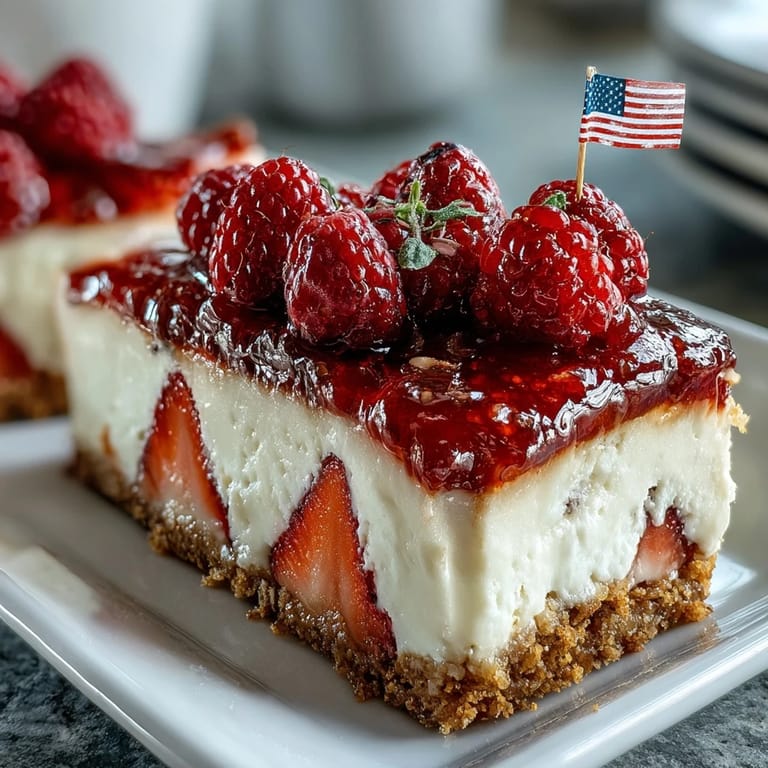
Save My sister texted me in a panic two days before the Fourth of July cookout—could I bring dessert? What showed up in my head wasn't some complicated layered thing, but this cheesecake flag that I'd seen pinned somewhere and never tried. The genius of it hit me immediately: no oven required on what would be the hottest day of the summer, creamy enough to feel special, and patriotic without trying too hard. I assembled it in my kitchen while my dog dozed through the afternoon heat, and by the time I pulled it from the fridge, I couldn't believe how elegant something this easy could look.
That Fourth of July, I set the cake out on the dessert table and watched people stop mid-conversation when they saw it. My niece asked if it was too pretty to eat, and her dad just laughed and cut into it anyway. Someone's friend who'd never met me before came back for thirds, and that's when I knew this recipe had earned a permanent spot in my rotation. There's something about food that looks this intentional that makes people feel like you actually care, even though you barely fussed.
Ingredients
- Graham cracker crumbs: The foundation that holds everything together—use full-fat butter here because it helps them compress into an actual crust that doesn't crumble when you slice.
- Unsalted butter, melted: This is the glue that turns crumbs into structure, so don't skip the melting step or you'll get a sandy mess instead of a unified base.
- Cream cheese, softened: Room temperature is non-negotiable; cold cream cheese won't blend smoothly and you'll end up with lumps no amount of beating fixes.
- Heavy whipping cream, cold: Keep this in the fridge until the last second—cold cream whips faster and holds peaks better than anything room temperature.
- Powdered sugar: Granulated sugar won't dissolve properly and you'll taste gritty filling, so resist the impulse to swap it out.
- Vanilla extract: A small amount makes a big difference; this isn't where you skimp or substitute with something artificial.
- Lemon zest, optional: A surprising brightener that cuts through the richness without making it taste like you added anything obvious.
- Fresh blueberries: Buy them the day before if possible and store them dry in the fridge—they'll stay firmer and look cleaner on the cake.
- Fresh strawberries, sliced: Cut them right before assembly so they don't weep juice into the filling and ruin the presentation.
- Fresh raspberries, optional: Swapping some for extra strawberries is fine if you can't find good raspberries or want deeper red tones.
Tired of Takeout? 🥡
Get 10 meals you can make faster than delivery arrives. Seriously.
One email. No spam. Unsubscribe anytime.
Instructions
- Build your crust foundation:
- Stir graham cracker crumbs with melted butter, sugar, and salt until it feels like damp sand with no dry pockets. Press it firmly into the bottom of your baking dish, using the bottom of a measuring cup to create an even, compact layer that will support everything above it.
- Chill while you prep:
- Stick the crust in the fridge while you work on the filling—this gives it time to set slightly and keeps your workspace organized.
- Cream the cheese until silky:
- Beat softened cream cheese for about a minute until it's completely smooth and cloud-like, then add powdered sugar, vanilla, and zest if using. Scrape down the bowl halfway through and beat until there are absolutely no visible lumps or streaks.
- Whip your cream to stiff peaks:
- In a separate cold bowl, whip heavy cream until it forms peaks that stand up on their own. This step is crucial because the air you're incorporating is what makes the filling light instead of dense.
- Fold gently to combine:
- Add the whipped cream to your cheese mixture in two additions, folding gently with a spatula rather than stirring—aggressive mixing deflates the air you just worked to create. The filling should be smooth, cloud-like, and noticeably fluffier than straight cheesecake.
- Spread and smooth:
- Pour the filling onto your chilled crust and use a spatula to create an even surface. Don't worry about it being perfect because the berries will cover any minor imperfections.
- Arrange the flag design:
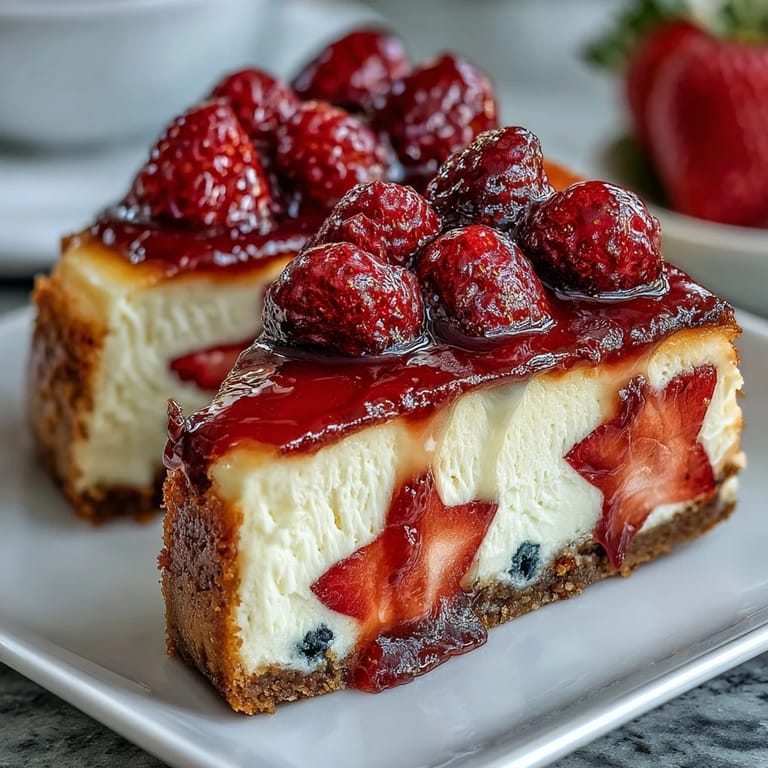
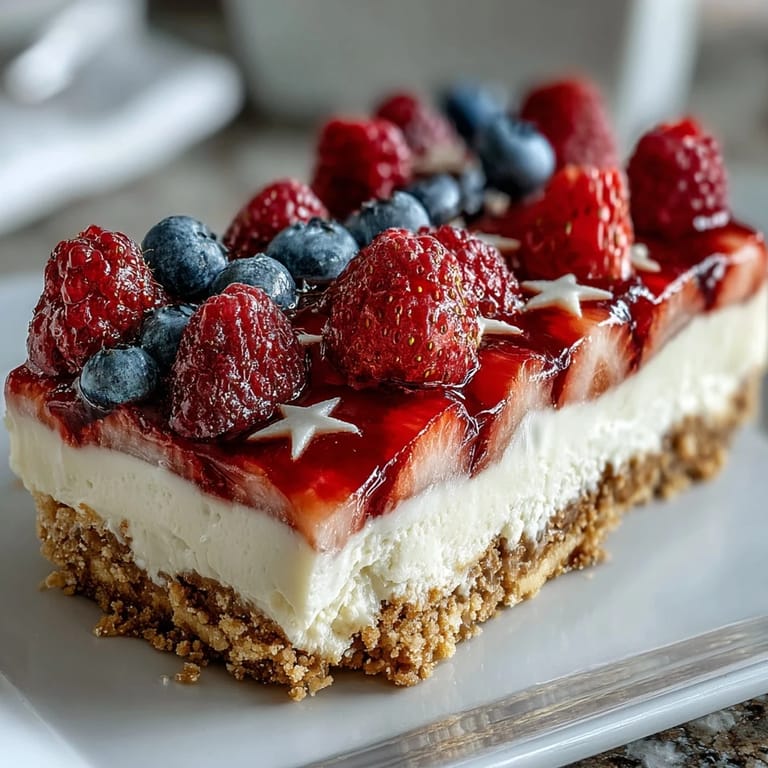
- Place blueberries in the upper left corner to represent the star field, then create alternating rows of strawberry slices (and raspberries if using) with plain filling between them to mimic the stripes. Step back and look at it—you'll be amazed at how instantly patriotic it looks.
- Add extra definition if desired:
- If you want sharper lines between the stripes, pipe whipped cream using a pastry bag, but this is entirely optional and the cake is gorgeous without it.
- Chill thoroughly:
- Cover and refrigerate for at least four hours, though overnight is ideal. The filling needs time to firm up so it slices cleanly and the flavors meld together.
- Slice and serve cold:
- Use a hot, wet knife wiped clean between slices to create neat portions. It's best served chilled, straight from the refrigerator.
 Save
Save What surprised me most that Fourth of July was how my mom, who usually stress-bakes everything from scratch, asked for the recipe afterward. She thought it must be complicated, and when I told her it was literally five minutes of actual work, she laughed at herself. That moment made me realize this cake does something special—it makes people feel cared for without requiring you to spend all day in the kitchen.
Make-Ahead Magic
You can assemble this completely one day in advance, which is honestly its greatest strength during party season. Cover it loosely with plastic wrap and let it set overnight in the fridge—the flavors actually improve as everything melds together. The only thing I'd skip ahead on is adding the fruit; save that for a couple hours before serving so the berries stay fresh and don't get weepy from sitting on the filling.
Flavor Variations Worth Trying
Once you make this once, you'll start seeing possibilities everywhere. Swap the lemon zest for orange or lime, use a different extract like almond, or even add a tablespoon of liqueur like Grand Marnier for something unexpected. The berry situation is completely flexible too—I've made it with raspberries covering most of the surface, and honestly it looked even more striking.
Serving and Storage Wisdom
This cake is happiest when served straight from the fridge, and it actually keeps beautifully for up to three days covered with plastic wrap. If you're bringing it somewhere, leave it in its baking dish rather than trying to transfer it to a platter—it stays intact and you'll avoid the stress of an accident in the car.
- A sharp chef's knife dipped in hot water and wiped clean between slices creates clean edges instead of squished portions.
- If you're serving a crowd, consider cutting it into smaller squares since the filling is quite rich and a little goes a long way.
- Leftover cake tastes even better the next day as flavors settle, so don't hesitate to make it a day early.
 Save
Save This cake somehow turned into one of those recipes I think about long after the holiday passes. There's something about making something beautiful that tastes this good, without fussing or stress, that stays with you.
Recipe Guide
- → How long should I chill the cheesecake?
Chill the assembled cheesecake for at least 4 hours to ensure the filling sets properly and the flavors meld.
- → Can I make this dessert gluten-free?
Yes, substitute regular graham cracker crumbs with gluten-free ones to adapt the crust without altering texture.
- → What’s the best way to achieve fluffy filling?
Whip cold heavy cream to stiff peaks before gently folding it into the cream cheese mixture to maintain a light and airy texture.
- → Can I prepare this in advance?
This can be made up to 24 hours ahead. For freshest appearance, add the fresh berry topping just before serving.
- → Are there optional ingredients for the topping?
Fresh raspberries can be added alongside strawberries for more vibrant red stripes, and whipped cream can be piped between rows for extra decoration.